|
NOTE: This article is about NATO's M4 Scorcher self-propelled gun artillery vehicle in ArmA 3. For the M4/M4A1 carbines in Armed Assault, ArmA 2 and ArmA Tactics, see M4A1. |
The M4 Scorcher is a self-propelled, heavy artillery vehicle used exclusively by NATO forces in ArmA 3.
Overview[]
- Role:
- Indirect fire support
| « | Based on the licensed version of an Israeli tank chassis, The Scorcher M4 is a 155 mm self-propelled artillery at the end of its lifetime cycle. It has modules allowing indirect fire, advanced artillery computer and is able to fire guided cannon ammunition. The rear of the tank was changed from a passenger transport space to ammunition storage. Scorcher is also equipped with a Remotely Controlled Weapon Systems turret fitted with 12.7 mm HMG and 40 mm GMG. Field Manual
|
» |
Design[]
Fitted with a 155 mm howitzer cannon as its primary weapon, the Scorcher is a powerful gun-based fire support vehicle that can launch a mixture of high-explosive, smoke, cluster, and even precision guided shells on targets at extreme distances.
Armament
The standard loadout of the Scorcher gives it 32 rounds of high-explosive (HE) shells for the main gun. In addition to the standard HE shells, 6 different sub-munition types are also available, forming a total of 24 more shells that can be loaded. These include:
- 2 rounds of infrared-guided (heat seeking) shells
- 6 rounds of scatter shells that can cover an area with anti-personnel (AP) mines
- 2 rounds of cluster shells that can saturate an area with a hail of explosive fragments
- 6 rounds of deployable white smoke shells that can cover the impact zone instantly in a thick cloud of smoke
- 2 rounds of laser-guided shells
- 6 rounds of scatter shells that can cover an area with anti-tank (AT) mines
For self-defence, the Scorcher also has an RCWS turret fitted on top that is armed with a dual-mount 12.7 mm heavy machine gun/40 mm automatic grenade launcher.
The externally mounted RCWS comes pre-loaded with a single 200-round belt of 12.7 mm ammunition and 96 rounds of high-explosive (HE) 40 mm grenades. Both the HMG and GMG each have a single belt to reload from.
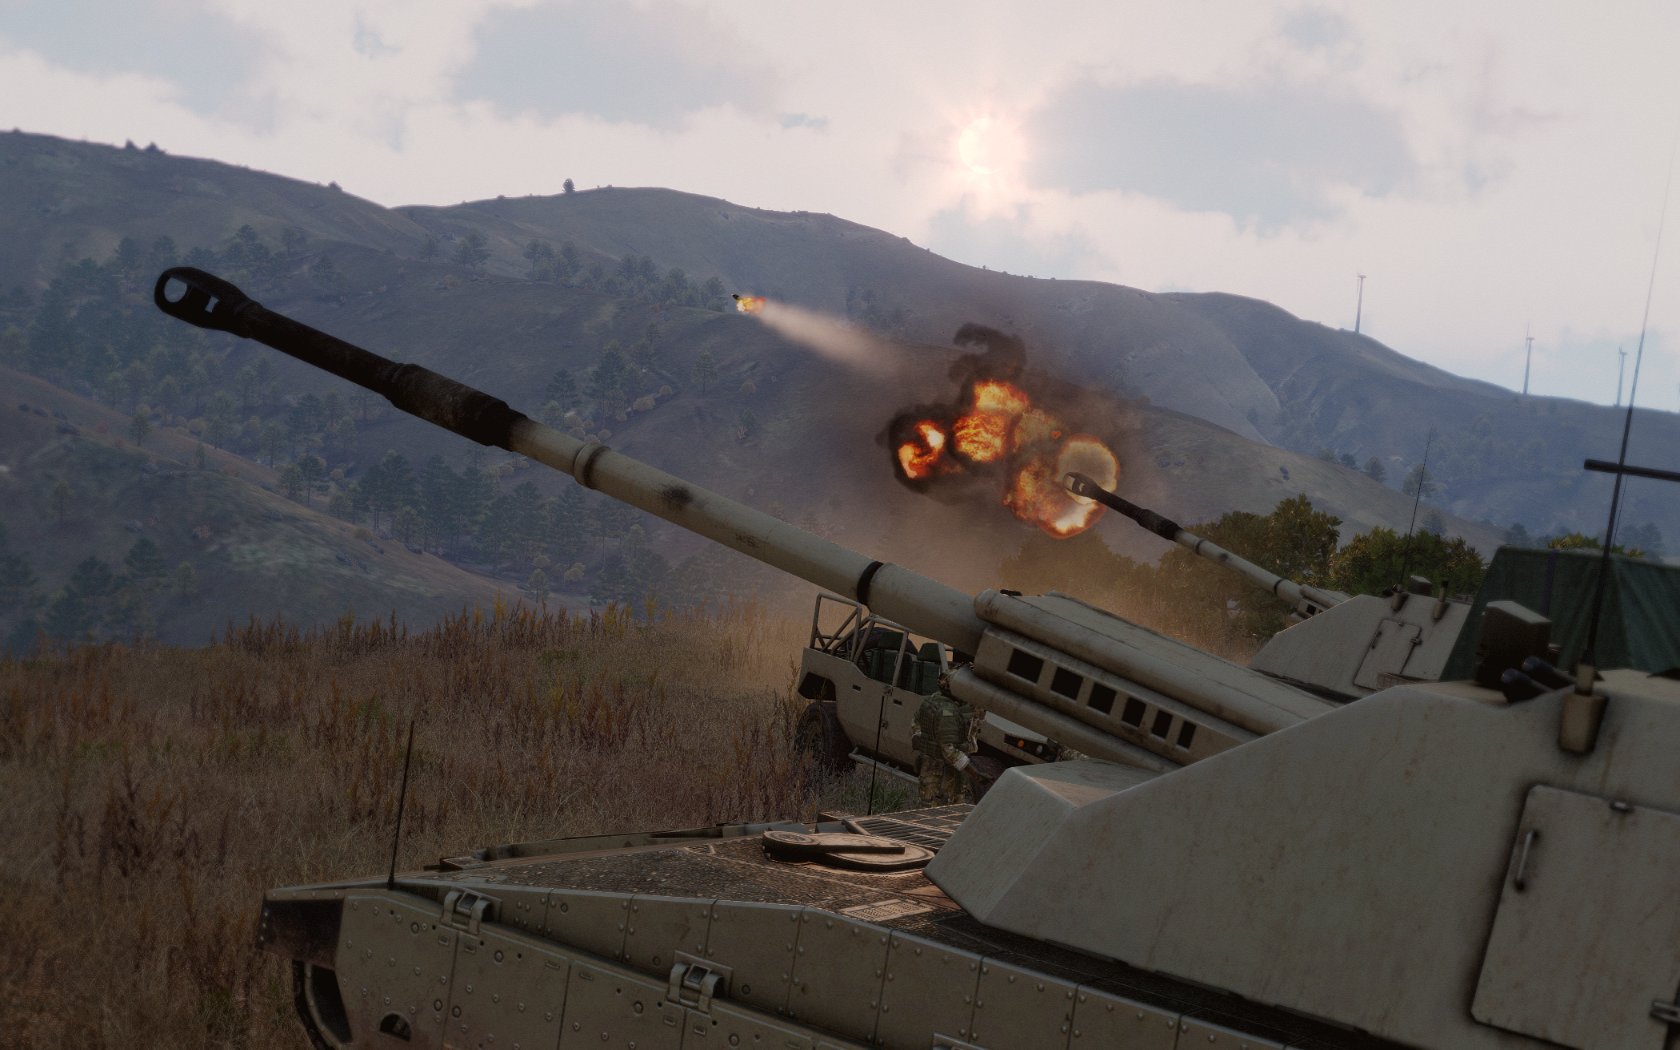

A battery of Scorchers carrying out a fire mission.
Features
The Scorcher shares the same chassis as its rocket-armed counterpart, which grants it the same level of protection as available to its MBT parent.
Drawbacks
However, care should still taken as even though the Scorcher is fairly well-armoured and can use its cannon in direct fire mode against close range targets, it is not a vehicle that should be seen on the front lines.
This makes it paramount that it be escorted by friendly units at all times as undefended Scorchers will become easy pickings for anti-tank infantry and other anti-armour threats.
Crew Capacity
The Scorcher has a seating capacity of three personnel for a crew consisting of the driver, gunner and a commander.
Camouflage[]


- Sand: Standard pattern-less dark tan paint scheme used by all NATO ground vehicles and certain aircraft. This can be universally employed in all types of terrain, but is more suited to arid and forested environments. Any camo nets applied on the Scorcher's hull or turret will use a two-tone desert camouflage pattern scheme.
- Olive: Tropical olive green paint scheme. Only useful for jungle or woodland environments. Camo nets attached to the Scorcher use a two-tone woodland camouflage pattern when this scheme is used.
Protection[]
The Scorcher has a base armour value of 900. It uses Composite Armour plating but does not have any Explosive Reactive Armour blocks/panels fitted. It is not possible to install slat cages onto the Scorcher.
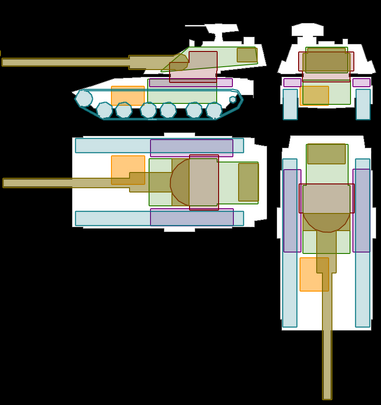
The following highlighted positions serve as weak points on the Scorcher:

LEGEND
Green = Hull
Orange = Engine
Violet = Fuel tanks
Light blue = Treads
Maroon = Turret
Gold = Howitzer barrel
Note that in order to inflict actual damage, a munition must first penetrate through the surrounding armour plates and directly hit the component's weak point. Any strikes on non-highlighted parts will cause little (if any) noticeable damage.
Hull[]
The hull can resist up to 1,620 points of damage. Will cause a catastrophic kill if fully depleted.
| Munition type | Damage reduction (%) | Velocity reduction (%) |
|---|---|---|
| Armour Piercing | None | 10 |
| High-Explosive | 80* | 50 |
| High-Explosive Anti-Tank | 80* | 80 |
| Tandem High-Explosive Anti-Tank | 80* | 10 |
(*) Reductions only apply to the explosive component of the munition i.e. Tandem HEAT explosive charge
If the hull has been compromised, no reductions will be applied to the velocity/raw damage of incoming projectiles.
Engine[]
The Scorcher's engine can only resist up to 360 points of damage, but reduces up to 80% of damage from HE-type munitions.
At least 20% of incoming damage onto the engine is always shared with the Scorcher's main "health" pool. It will not result in a catastrophic kill even if it's destroyed unless the Scorcher is critically damaged.
If damaged: Reduces power output, acceleration is decreased and it may become impossible to climb uphill.
If destroyed: Instantly immobilises the Scorcher.
Fuel tank[]
The Scorcher's fuel tanks can only take 270 points of damage before they rupture. However, they take 40% reduced damage from HE-type munitions.
At least 10% of incoming damage onto the fuel tanks will always be shared with the Scorcher's "health" pool. A destroyed fuel tank will not cause a catastrophic kill by itself unless the Scorcher is already at critical "health" status.
If damaged: Gradually leak fuel over time, but it will stop at a threshold of 70% of the Scorcher's total fuel capacity.
If destroyed: Causes it to rapidly lose its entire fuel capacity in just a few seconds.
Treads[]
Both treads can resist 650 points worth of damage. No amount of damage inflicted on them is transferred onto the Scorcher's "health" pool. It reduces only 20% of damage from HE-type munitions.
Destroying either one of the treads will hamper the Scorcher's handling but will not prevent it from moving. Destroying both will severely degrade the Scorcher's handling and can prevent it from moving while on rough terrain.
Turret[]
The turret can resist up to 720 points worth of damage. No amount of damage incurred is shared with the Scorcher's "health" pool.
| Munition type | Damage reduction (%) | Velocity reduction (%) |
|---|---|---|
| Armour Piercing | None | 10 |
| High-Explosive | 80* | 50 |
| High-Explosive Anti-Tank | 80* | 80 |
| Tandem High-Explosive Anti-Tank | 80* | 10 |
(*) Reductions only apply to the explosive component of the munition i.e. Tandem HEAT explosive charge
If the turret's armour has been compromised, no reductions will be applied to the velocity/raw damage of incoming projectiles.
Howitzer barrel[]
The barrel of the turret's howitzer cannon can resist 540 points of damage before failing. No damage inflicted on this component is transferred onto the Scorcher's "health" pool.
Destroying this component will lock the barrel and prevent the gunner position from adjusting its elevation/depression. It should also be noted that unlike the turret, the barrel is only capable of reducing 60% of incoming damage from HE-type munitions.
RCWS[]
The commander's RCWS turret can resist up to 720 points worth of damage. No amount of damage incurred is transferred onto the Scorcher's "health" pool.
| Munition type | Damage reduction (%) | Velocity reduction (%) |
|---|---|---|
| Armour Piercing | None | 10 |
| High-Explosive | 80* | 50 |
| High-Explosive Anti-Tank | 80* | 80 |
| Tandem High-Explosive Anti-Tank | 80* | 10 |
(*) Reductions only apply to the explosive component of the munition i.e. Tandem HEAT explosive charge
If the RCWS turret's armour plating has been compromised, no reductions will be applied to the velocity/raw damage of incoming projectiles.
Components[]
NOTE: Cosmetic-only component modules with no gameplay effects are deliberately excluded from this section.
- Camo Net (Hull): Drapes the entire hull with camouflage netting. Partially conceals covered sections from thermal sensors.
- Camo Net (Turret): Identical to the Hull camo net, but for the turret instead. Most of the surface area is concealed by netting, though certain components such as the RWS and the barrel are not covered.
Armament[]
The gunner position handles the primary Howitzer 155 mm, while the commander controls the dual-mount RCWS HMG 12.7 mm/RCWS GMG 40 mm remote weapons turret.
For optics, both the commander and gunner have variable zoom optics. However, only the commander can toggle a day, night or black-/white-hot thermal vision mode. The gunner is restricted to just day and night vision modes:
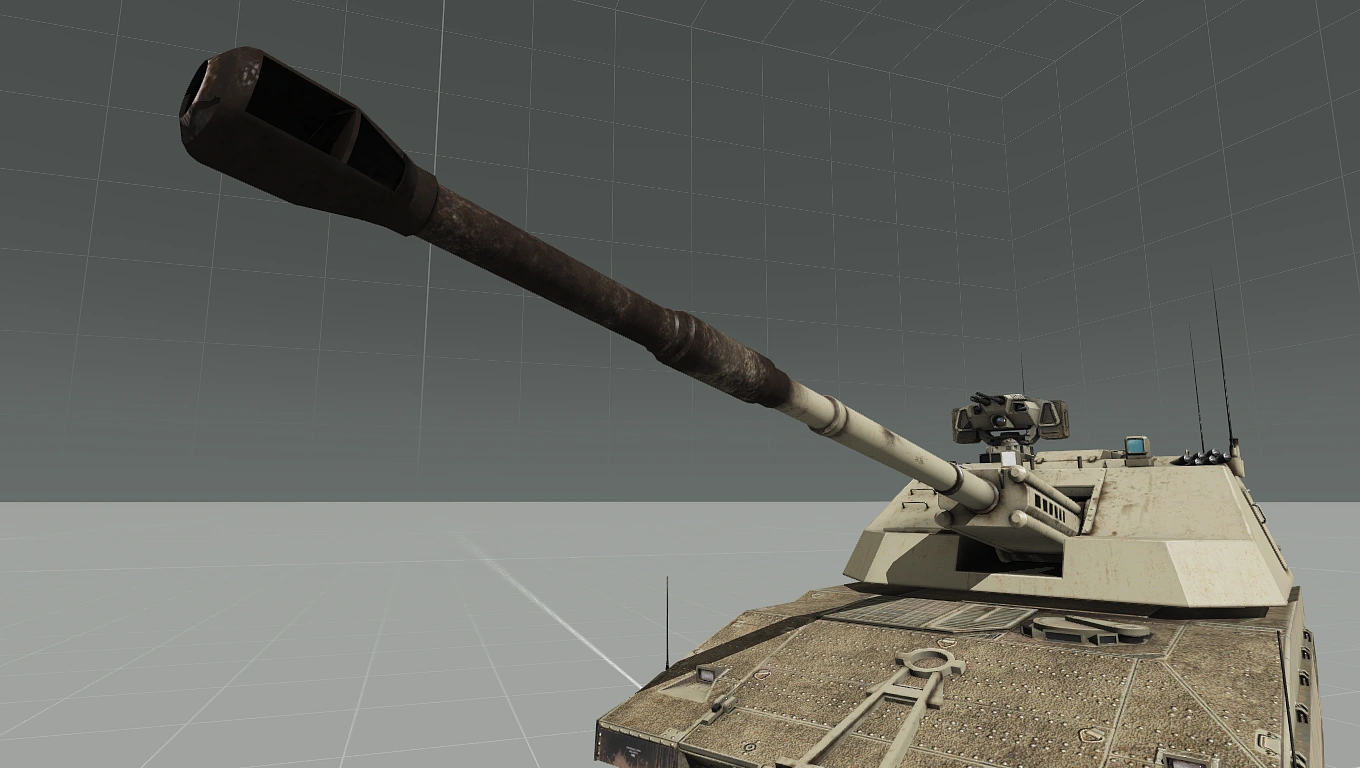
Howitzer 155 mm[]
NOTE: Refer to the Capabilities and Manual Firing sections for a more detailed explanation of the Howitzer 155 mm's usage.
| Shell name | Base damage value | Damage type | Initial velocity (m/s) |
|---|---|---|---|
| HE | 340 | High-Explosive | 810 |
| Guided (Primary) | 300 | High-Explosive | 810 |
| Guided (Secondary) | 1,200 | High-Explosive | N/A |
| Cluster (Primary) | 300 | High-Explosive | 810 |
| Cluster (Secondary) | 35 | High-Explosive | N/A |
| LG (Primary) | 300 | High-Explosive | 810 |
| LG (Secondary) | 1,200 | High-Explosive | N/A |
155 mm self-propelled howitzer.
It has a muzzle velocity of 810 m/s. Without a firing solution selected, the Howitzer 155 mm can fire one shell every 7 seconds (~ 8 rounds per minute). It also takes 7 seconds to switch between munition types.
Blast radii, guidance type (if applicable) and penetration depth vary depending on the type of shell loaded. Smoke and AT/AP scatter shells do not have explosive payloads as they are fitted with dummy warheads designed to disperse submunitions instead (and are therefore not listed here):
- High-Explosive (HE): 30 metre blast radius, has a penetration depth of 121.5 millimetres (direct impact only).
- Guided: 4 metre blast radius, infrared-guided; will attempt to home in onto "hot" vehicles within a radius of 800 metres. The submunition separates from the main shell once it is 500 metres above the impact zone. The IR seeker has a 10% chance to lose lock against smoke countermeasures.
- Cluster: Will separate into multiple smaller explosive fragments once the dummy shell is 200 metres above the impact zone. The primary shell will disperse these fragments in a 35 metre radius. The fragments each have an 8 metre blast radius and have a 7% chance of failing to detonate, leaving behind Unexploded Ordnance (UXO) pieces.
- Laser Guided (LG): 4 metre blast radius, laser-guided; can only lock onto laser spots within a radius of 800 metres. The submunition will "launch" from the dummy shell once it is 500 metres above the impact zone and begin seeking a laser spot.
- The gunner is also able to toggle a live camera feed from the shell once it is separated. If no laser spot can be found, the shell will simply strike the point below where it separated from the primary shell.
RCWS HMG 12.7 mm[]

| Base damage value | Aerodynamic friction | Initial velocity (m/s) | Penetration depth (mm) |
|---|---|---|---|
| 30 | -0.00086 | 910 | 35.49 |
General-purpose 12.7 mm heavy machine gun.
The RCWS HMG can attain a fire rate of up to 600 RPM and requires 20 seconds to reload a fresh box or to fully rearm from a logistics vehicle. Accuracy-wise, it has a fixed dispersion of 0.0012 rad regardless of distance.
The Fire Control System is only able to automatically zero on stationary targets and requires 1 second to finish adjusting. Manual zeroing is also possible, though only in increments/decrements of 100 m (up to a maximum of 2000 m).
RCWS GMG 40 mm[]

| Damage type | Base damage value | Aerodynamic friction | Initial velocity (m/s) |
|---|---|---|---|
| High-Explosive Anti-Tank | 100 | -0.001 | 241 |
40 mm automatic grenade launcher. Fires grenades fitted with high-explosive anti-tank (HEAT) warheads. They have a blast radius of 4 metres.
It can attain a fire rate of up to approximately ~ 349 RPM. It also requires at least 20 seconds to reload a fresh belt of grenades or to fully rearm from a logistics vehicle. Accuracy-wise, the GMG has a dispersion of 0.005 rad.
The FCS can only zero onto stationary targets and requires 1 second to finish adjusting. Like the RCWS HMG, manual zeroing is also possible with adjustments being made in increments/decrements of 100 m. However, it is restricted to a hard cap of 1500 m which cannot be exceeded even by the FCS.
Capabilities[]
It fires all 32 HE rounds in four minutes and 12 seconds, averaging at just under 8 seconds per shot. This makes its fire rate considerably slower than the Mk6 Mortar, although its damage and blast radius per shell is significantly greater.
The Scorcher has five range modes available for firing:
- Close range: 826 to 2,415 metres (ETA 30-22 seconds)
- Medium range: 2,059 to 6,021 metres (ETA 48-35 seconds)
- Far range: 5,271 to 15,414 metres (ETA 78-56 seconds)
- Further range: 14,644 to 42,818 metres (ETA 130-96 seconds)
- Extreme range: 22,881 to ~67,112 metres (ETA 162-117 seconds)
Overlaps occur in the following ranges:
- 2,059-2,415 metres (Close and Medium)
- 5,271-6,021 metres (Medium and Far)
- 14,644-15,414 metres (Far and Further)
- 22,881-42,818 metres (Further and Extreme)
Unfortunately, this means that when simply using the built-in artillery computer, the Scorcher can only perform MRSI strikes in narrow nearby bands, or in the large band beyond ~23 km. It is also unable to have more than two volleys landing on the same target at the same time.
Note however that the built-in computer tends towards using low-angle trajectories. The Scorcher is capable of firing at up to an 80 degree angle from flat ground. This means that it is technically capable of getting multiple volleys to land on the same target simultaneously, but it would require manual calculation of the appropriate trajectories, or the use of spreadsheets or third-party applications.
Manual Firing[]
By default, the turret can be manually raised and lowered with the page up and page down keys. For precision aiming, the rate of adjustment can be slowed by holding down the shift key (by default) while aiming up or down.
It is also possible to adjust range mode without the artillery computer, though this is more difficult. By default, using the F key will cycle through the different range modes, from Close range through to Extreme range and back to Close. It is also possible to bind a key to go from longer ranges to shorter ranges, though there is no default binding for it (Weapons > Previous weapon).
Although there is no indicator without the artillery computer to determine which firing mode is currently active, it is possible to work it out by using the rangefinder to point at an object within Close range (826-2,415 metres) and cycling through the firing modes until the red X on the crosshair goes away, indicating you've returned to Close range.
Trivia[]
- The Scorcher's turret is based on the real-life "M109 Paladin" SPG.
- More specifically, it is modelled after the turret used on "M109A7" variants which share common components with the "M2/M3 Bradley" IFV.[1][2]
- Along with its parent vehicle and rocket artillery counterpart, the M4's chassis is based on the "Merkava Mark IV" MBT.
- The M4's overall appearance and role is nearly identical to that of the real-life "Sholef" SPG, a prototype gun-based artillery variant of the "Merkava Mark I" that was designed by Soltam Systems of Israel.[3]
- Co-incidentally "Sholef" in Hebrew translates to Slammer, which is the name of the M4's parent vehicle.
- The Scorcher was not originally featured as an asset in the Alpha and Beta. It would only be included as a usable vehicle after the game's full release (as part of Game Update 1.00).[4]
- Before Game Update 1.10, an engine bug would cause AI-controlled Scorchers to ignore any FIRE ARTILLERY commands issued to them by human players.[5]
- After Game Update 1.12, the Scorcher's side skirts were changed so that they would animate if the vehicle was driving over rough terrain (the skirts would remain static before the patch's release).[6]
- Prior to Game Update 1.34, the Scorcher's IR-guided artillery shells would always miss their targets even if enemy vehicles were present at the impact zone (the shells did not lock onto vehicles properly).[7]
- In addition, any shells that prematurely detonated before hitting their intended targets would inflict zero damage. This applied to all shell types; both the default HE and dispenser-type shells included.[7]
- Initially, the Scorcher's IR- and laser-guided shells had different base damage values, with LG shells inflicting more damage (800) compared to their IR-guided counterparts (600). After Game Update 1.58's release, their damage values were standardised so that they now deal the same amount of damage.[8]
Gallery[]
")
")
")
")
")
References[]
- ↑ Praveen 2022, Paladin M109A7 155mm Artillery System, Army-technology.com, viewed 10 March 2023, <https://www.army-technology.com/projects/paladin-m109a7-155mm-artillery-system/>.
- ↑ Army-technology.com 2020, Bradley M2/M3 – Tracked Armoured Fighting Vehicle, Army-technology.com, viewed 10 March 2023, <https://www.army-technology.com/projects/bradley-m2-m3/>.
- ↑ WeaponSystems.net 2021, Sholef, WeaponSystems.net, viewed 10 March 2023, <https://weaponsystems.net/system/152-Sholef>.
- ↑ van 't Land, J.J. 2013, SPOTREP #00010, Arma 3, viewed 25 August 2023, <https://dev.arma3.com/post/spotrep-00010>.
- ↑ van 't Land, J.J. 2014, SPOTREP #00017, Arma 3, viewed 14 October 2023, <https://dev.arma3.com/post/spotrep-00017>.
- ↑ van 't Land, J.J. 2014, SPOTREP #00019, Arma 3, viewed 10 March 2024, <https://dev.arma3.com/post/spotrep-00019>.
- ↑ 7.0 7.1 van 't Land, J.J. 2014, SPOTREP #00036, Arma 3, viewed 14 October 2023, <https://dev.arma3.com/post/spotrep-00036>.
- ↑ Kovařič, V 2016, SPOTREP #00054, Arma 3, viewed 14 October 2023, <https://dev.arma3.com/post/spotrep-00054>.
External links[]
See also[]
Variants[]
Vehicles of comparable role and configuration[]
- 2S9 Sochor (CSAT counterpart)
| Wheeled | AMV-7 Marshall • HEMTT • Hunter • Prowler • Quadbike • Rhino MGS (UP) • UGV Stomper |
| Tracked | CRV-6e Bobcat • ED-1D Pelter (ED-1E Roller) • IFV-6a Cheetah • IFV-6c Panther • M2A1 Slammer (A4 UP) • M4 Scorcher • M5 Sandstorm |
| Rotor-wing | AH-9 Pawnee • AH-99 Blackfoot • AL-6 Pelican • AR-2 Darter • CH-67 Huron • MH-9 Hummingbird • MQ-12 Falcon • UH-80 Ghost Hawk |
| Fixed-wing | A-164 Wipeout • F/A-181 Black Wasp II • MQ-4A Greyhawk • UCAV Sentinel • V-44X Blackfish |
| Aquatic | Assault Boat (Rescue) • Speedboat Minigun • SDV |
| (Parenthesis) denote variants. Helicopters DLC | Apex DLC | Jets DLC | Laws of War DLC | Tanks DLC | Contact DLC | |